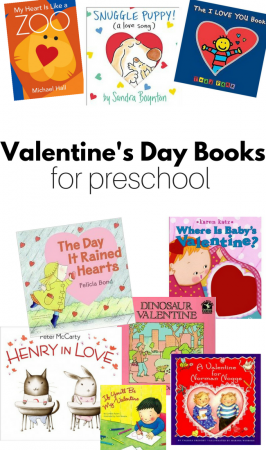
Creepy, crawly and slimy are a few ways to describe these swamp craft and activity ideas for kids. You could also say fun, educational and engaging. Check out these 15 swampy ideas!
Paper Plate Frog Craft
Swamp Sensory Tub
Shape Snake
A is for Alligator Letter Craft
Painting with Bugs
Walnut Shell Turtles
Band-aid Lightning Bugs
Paper Plate Tadpole
Doily Painted Dragonfly
Lily Pad Math
Painting with Snakes ( or worms)
S is for Snake Letter Craft
Paper Bag Frog
Venus Flytrap
Paper Plate Turtle
By Jean Van’t Hul
Do you wonder what to do with all of the art that your kids produce? If your children are anything like mine, they draw and paint a lot. I’m often trying to think of ways to use or display their many masterpieces.
Some go on the wall, some get sent to Grandma, some are stored (and some, frankly, end up in the recycle bin).
While I have a whole chapter on displaying, reusing, and storing art in my new book, The Artful Parent: Simple Ways to Fill Your Family’s Life with Art and Creativity, I’m still always seeking out or thinking up new ideas. This spring, for my husband’s birthday, my daughters and I created t-shirts for him, using transfers of some of their recent drawings.
These T-shirts make great gifts and my kids were literally beaming with pride when they presented theirs.
Here’s how to make them…
Transfer a Child’s Drawing to a T-Shirt
MATERIALS
- Children’s drawings
- T-shirt(s)
- Fabric transfer paper (This is widely available at craft stores, office supply stores, and online. If you have a white or yellow t-shirt, make sure to get the kind that says for light-colored shirts. And ditto for dark-colored shirts. You’ll need the packet that specifies dark colored shirts if you’re working with blue or black…)
- Ink-jet printer/copier
- Scissors
- Iron
INSTRUCTIONS
1. Copy your children’s drawing onto the fabric transfer paper following the instructions on the packet.
2. Cut out the image, rounding corners as you go as much as possible.
3. Match the drawings up with the T-shirts.
4. Iron your shirt to remove any wrinkles and then then position the drawings as desired.
5. Next, follow the packet instructions to iron the drawings onto the shirts. This will vary depending on whether you are transfering onto light shirts or dark shirts. It may even vary from brand to brand so make sure to read the instructions provided.
Here’s what we did:
For light-colored shirt transfers: Turn the transfer paper image side down. Iron the paper to the shirt. Let cool, then peel off the paper backing.
For dark-colored shirt transfers: Peel off the paper backing first and then arrange the image right side up. Cover image with ironing paper provided then iron the image onto the shirt. Let cool then remove the ironing paper.
Here’s my older daughter, Maia, pulling the paper backing off to reveal her owl drawings.
And here’s my three-year-old Daphne’s very first person drawing transferred onto an oatmeal-colored shirt after we (um, I) botched the first attempt onto the navy shirt by not reading the instructions properly. Ahem. So learn from my mistakes, folks!
This is not a difficult process at all, but the iron-on instructions are different depending on whether you’re doing the light or dark T-shirt transfers.
The girls wrapped the shirts with birthday paper and lots (and lots!) of tape and ribbon. They were SO excited to present their Daddy with the shirts they had made with their own drawings.
We’ve since made several more T-shirts using fabric transfers of their drawings. They each made a shirt for themselves. And I’ve heard rumblings that one or two might be in the works for me as a Mother’s Day present…
Jean Van’t Hul writes about easy and fun arts and crafts ideas at The Artful Parent and has a new book out, The Artful Parent: Simple Ways to Fill Your Family’s Life with Art and Creativity, that combines the whys and how-tos of children’s art with 60 all-time favorite activities.
Anyone who thinks that sensory play is just for toddlers needs to see this post. Since making the swamp sensory tub last year my kids have asked to do another one just like it. I didn’t mean for so long to go by but we finally go around to it and this time made it into an ocean sensory tub with blue gelatin. Play like this is fun and simple and perfect for summer . We leave ours out covered in our yard for a few days and observe how the gelatin changes throughout the day.
- Gather your materials. You will need a container to make the gelatin in, a large container to play in ( we use our … ) , some fun sea animals and glass pebbles, plain gelatin ( I used 5 boxes) and some blue food coloring. You will also need a little bow, scissors, many cups of water and a pot or kettle for the boiling water.

- Start by pouring all the gelatin into a little bowl – 5boxes = 20 packets of gelatin.

- Boil 5 cups of water . Add a few drops of blue coloring to the water.
- Pour 15 cups of cool water into your container.
- Sprinkle the gelatin on top and let rest for one minute.

- Pour the boiling water in and stir until the gelatin is dissolved.
- Hide in your fridge behind yogurt. Well that’s what I did because the last thing I wanted was blue gelatin all over my kitchen . When I made the rainbow gelatin sensory tub I spilled some blue and it it forever to get that stuff off.

- When the gelatin is set about 3 hours ( ours was a little under done but the kids were eager) grab the sea animals and get the table prepared.

- They explored the gelatin before putting it in the table. Touching and tasting it. ” It tastes like zero, nada, nothing .”

- Then we added the gelatin.

- Play!! Clearly the 6 yer old was into it. Literally.

- Because ours was a little under done it was stickier than normal and required more washing off – so they ran to the water in our yard and cleaned themselves off.

Link up and share kids crafts, family fun ideas and more.
Let’s see all the wonderful ideas out there for fun and learning with kids. If you have a post or two to share please do so my readers can find new blogs, and new ways to teach and have fun with their kids.
Also check out our Pinterest boards for even more ideas ( and some not kid related ideas too) .
The school year is almost over and if you are like me you have already started planning your family calendar for the whole season. Before you declare all the planning done take some time and plan your summer reading adventure!
Summer reading isn’t just for fun it’s the best way to prevent summer slide. Did you know that it’s estimated that teachers spend on average 4-6 weeks re-teaching material children have forgotten over the summer? Think of all the time that teachers could have for other things if we send our kids ready to learn new material instead of reviewing and re-learning . My kids and I brainstormed fun, silly and educational ideas for summer reading and came up with this bucket list. Follow the links to book recommendations .
- Read in a tent.
- Read a book about wild animals.
- Read a book in the bath.
- Read a book under a tree.
- Read a book about a city far away.
- Read at dinner.
- Read a magazine.
- Read as a family.
- Read a book about your country.
- Read in a blanket fort.
- Read a book about friendship.
- Read a comic book.
- Read at the park.
- Read a magazine.
- Read a book about art.
- Read a book that makes your laugh.
- Read a book with a flashlight.
- Read a book to a pet.
- Read at the beach.
- Read a book about space.
- Read a book in a funny accent.
- Read a book while having ice cream.
- Read a book then act it out.
- Read a book and capture it on video.
- Read a biography.
- Read a book with chapters.
- Read a book about bugs.
- Read a book without any words.
- Read an alphabet book.
- Read a pop up book
- Read at breakfast.
- Read a book you wrote yourself.
- Read an ebook .
- Read all summer long.
As you know together with Amy Mascott I write all about family literacy for Scholastic Parent’s Raise A Reader blog . On Monday night we will be taking over Scholastic Parent’s Facebook page for a great kick off of their Scholastic Summer Challenge. This year is set to be the best yet and Amy and I will be answering questions to get you and your family ready for a summer filled with reading. Do not miss it!


