{Hello! If you are checking us out for the first time and like what you see you can follow us on Pinterest and Facebook to get new ideas to play and learn with your kids daily. }
When I originally posted this snowman craft I had a feeling it would be a hit, sure enough I have seen a bunch of these snowmen on my readers blogs and it came in at number 3 on our countdown – Best of 2008! One reader also emailed me to let me know she used a ziplock instead of contact paper with awesome results!
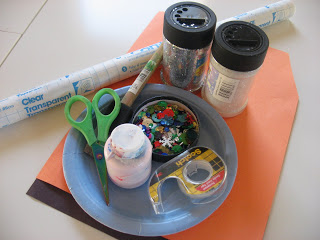
- Gather your materials. You will need a paper plate, some orange and black construction paper, 2 buttons, some sequins, sparkles, contact paper, scissors, double stick tape, a stapler, and some ribbon. I also used some paint because my son wanted to paint and I like how it looks but you can skip this step if you want.
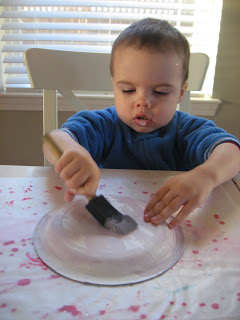
- Have your child paint the paper plate, and let dry. If you use a sponge paint brush the paint will go on lightly and dry fast.
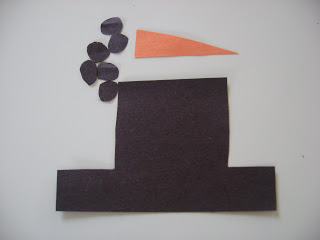
- While they do that cut out a nose from the orange paper, a hat and some coal for the mouth.
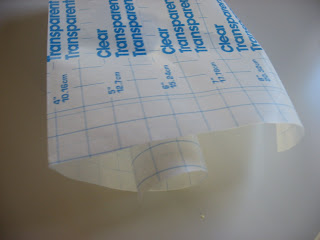
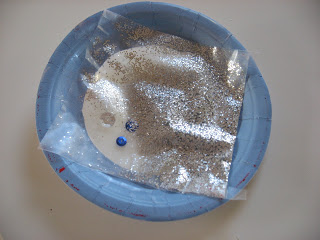
- Cut a rectangle of contact paper and fold in half , make sure it’s big enough to cover the hole you will be cutting in the plate.
- Peel back the contact paper backing and let your child shake the sparkles on it.
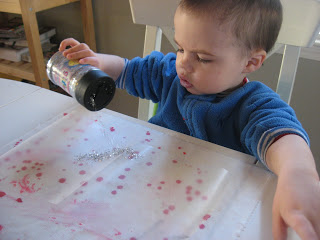
- Add some sequins.
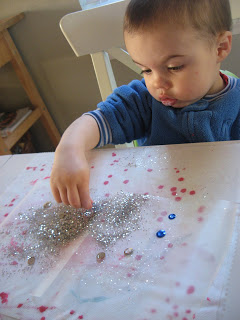
- Fold the contact paper so it sandwiches the sparkles , seal it. You may have to use some tape to make sure it’s sealed and nothing falls out.
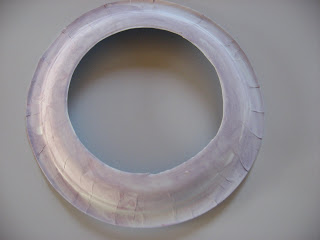
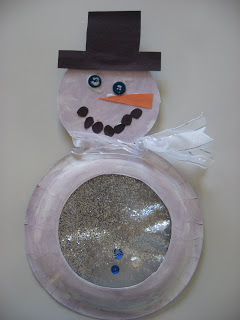
- Cut out the middle of the plate.
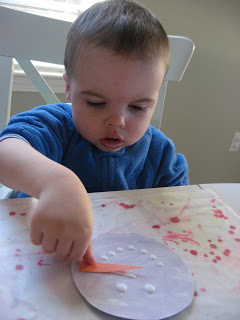
- Add glue to the cutout middle for the coal mouth, nose and hat. Obviously older kids can do this themselves but it gives toddlers a great guide to be independent.
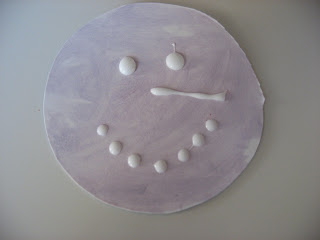
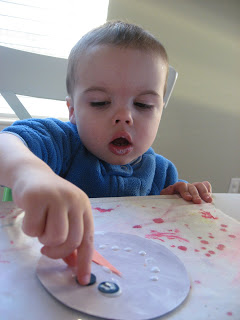
- Add the face pieces.
- Add the button eyes.
- While your child is adding the face pieces , attach the contact paper to the inside of the paper plate ring, I used double stick tape cause it holds contact paper well.
- Staple the face to the belly, I use staples with coated paper plates because glue doesn’t always work very well.
- Add the ribbon as a scarf to cover the staples.


Angela says
Great idea. Thanks for the info.
Valerie Deneen says
It’s beautiful! I love it! I have some leftover clear contact paper, and this would be a great way to use it up… thanks!
Valerie
Frugal Family Fun Blog
ScottChrisCoriCassiCali says
We made these with our preschool group and everyone loved making them. It was a darling idea. We make a lot of your ideas and always enjoy them! This countdown is a fun reminder. Thanks.
Professional Mommy says
yes, I loved this one! The corn was my #1 and this was my #2!
Demi says
That is very clever and cool.
Heather says
Way cool snowman!! We have been talking the past couple of days. We had several snowman activities that we did. I look forward to doing this one with her. Thanks for sharing!! 😉
Cindy deRosier says
I’m the Editorial Assistant for Fun Family Crafts and I wanted to let you know that we have featured your snowglobe snowman project! You can see it here:
http://funfamilycrafts.com/snow-globe-snowman/
Thanks for another great project idea!
Amanda says
Congrats! I’m just stopping by to let you know that this post was selected as an Editor’s Pick for December (yes, we’re a bit behind in posting these!) over at Fun Family Crafts. 🙂 You can see it here http://funfamilycrafts.com/editors-picks-december-2013/
kathy king says
Hi I just wanted you to know I loved your DIY Christmas Craft post. So I added it to my 50 Christmas Crafts for Kids post.
In addition, I included a 125 x 125 image of your project in a college
Here is a link to the live post.{ http://www.mrskathyking.com/50-christmas-crafts-kids/} If you don’t wish for me to share you work with my fan. Please email me and I will remove you :).
Have a blessed day,
Kathy King
Trish says
I wonder if it’s possible to double seal a zip lock bag with water and glitter and stick it to the inside of the plates, then put the plates together?
Allison McDonald says
I’d totally try!