My dear friend and contributing writer Kim sent us this melted crayon art a few weeks ago and it and my son’s desire to melt things with a hair dryer ( how this art was made) inspired this new take on an old stain glass craft. You may remember making crayon stained glass leaves in preschool, I know I do. I have a clear memory of my preschool teacher Fran ironing our crayon shavings. Since my son wanted to do the melting I switched an iron for a hair dryer. As you will find out there is a reason Fran used the iron… it was not easy making this stained glass leaf craft “kid friendly” and not even all that “kid-friendly”. Some days we hit it out of the park, some days we don’t.
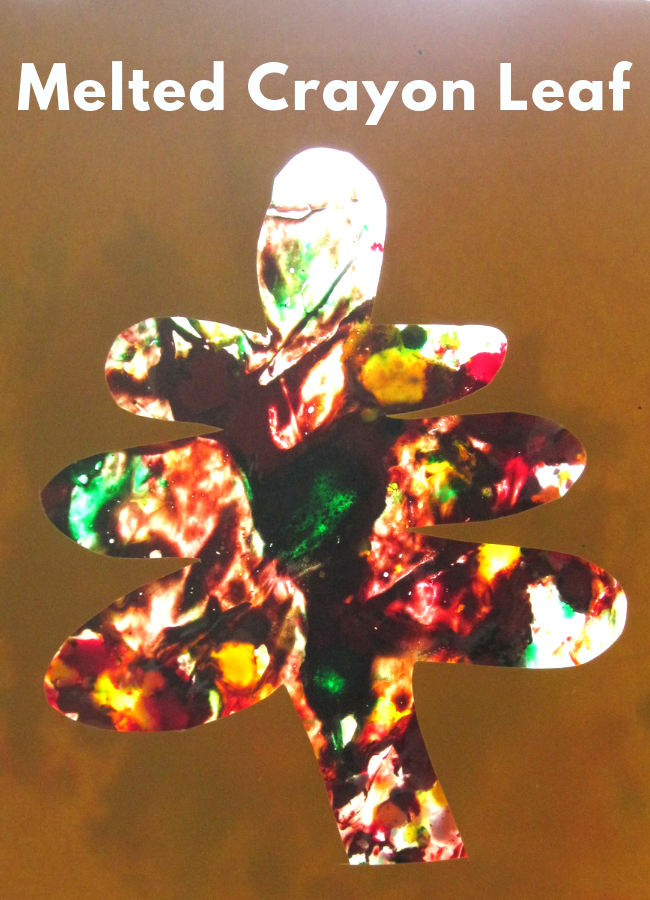
- Gather your materials. You will need a crayon sized pencil sharpener or a zest grater, crayons in various fall colors, wax paper, card stock, scissors and tape. Og and a hair dryer … possibly iron.

- Start by peeling the paper off the crayons. This is fantaboulous fine motor skills practice.

- Next grate or sharpen the crayons into little bits. Our sharpener broke half way through ( should have been a sign of things to come), so we attached it with pinking sheers, I do not suggest this method. Crayons bits were flying at a high rate of speed all over our playroom. Instead, use a zest grater or if you have it one of those parmesan wheel graters would be rad for this. You need the wax to bit thin and small for it to melt.

- Put it all on the waxpaper.

- Sandwich it and either hold it down or tape it to the table. Either way when the blow dryer starts you want a firm grip on it so bits don’t ( yet again if you are us) go flying everywhere.

- Even on high my trusty hair dryer from 1989 took a long time to melt the thick bits… I really need to try this again with a parmesan grater, why I didn’t think of that until now after we did it is beyond me.

- While the wax cools. Draw a leaf and cut it out of the cardstock so you are left with what looks like a stencil.

- Tape the melted wax to the paper ( I tape it all along the wax paper just in case some wax breaks off then it won’t fall into my carpet )
 and hang up in a window.


Overall this project was fun, especially for my son who loved every step especially the ones I would call screw ups. That’s the thing when I break it all down we do crafts with kids not to make the prettiest thing but to have fun, make memories and share some time together. Even if some of that time was picking up pieces of crayon that shot ten feet across the room. I should note if you do use an iron make sure the crayon shavings are sandwiched between the wax and still use a towel under it when you pass the iron on low over it. Wax paper is usually great but sometimes the color leaks through.
Leaf Books

Leaf Man by Lois Ehlert was the inspiration for this craft and will leave you trying to find all sorts of things like butterflies, chickens and fish in leaf piles. The book is about a leaf man who blows away in the wind and the reader is taken past all sorts of animals like chickens and ducks, past rivers filled with fish and butterflies in the air. All are leaves pieced together to make these awesome images , some are obvious, some take concentration to see the animal among the leaves. Wonderful creative book to welcome the changing seasons.

When Autumn Falls by Kelli Nidey is a stunning book, the illustrations which are painted paper collages, by Susan Swan are so richly colored you will want more after turning the last page. The text is clever as well. Readers will discover that fall is well named not just because of falling leaves, but also pumpkins falling from the vines, temperatures falling, seeds falling from their leaves and even football players falling! The text is the perfect length for toddlers but not too short for preschoolers too. Cute book for this time of year.
ldemmert says
You can also use table top warming trays: faster and just as safe as hairdryers. This one is much more elaborate than the one I use but will give you an idea of what I mean. http://www.freshfinds.com/tabletop-entertaining_entertaining/stainless-steel-warming-tray/
amy says
Excellent Craft! My boys loved it! I actually used a hand held pencil sharpener as opposed to scissors to break up the crayons. I was able to use one and go pretty quickly through a crayon to help speed up the process, and they melted alot quicker. We were able to make 3 pictures in about 15 minutes! We will be doing this one again! Thank you!!!!!!!!!!!!!!!!!!
Catriona Daly says
Might try this – I have a paint stripper and also a craft (mind goes blank as I try to remember what it is called) heat gun thingie – might try that with my son and a pencil sharpener! Thanks for the great Ideas!
Catriona Daly says
We had a go at the craft today – I used my hot air gun – I remembered the name today! 😉
http://blackpaws.wordpress.com/2011/11/23/stained-glass-christmas-craft/
Thanks for the inspiration! Very messy but still fun and definetly a Do Over!
Toddler Approved says
The visual of crayon shavings flying all over the room made my day. Thanks for sharing a partial craft fail… you did a great job turning it into such a fun activity that also looks gorgeous.